
Last summer, I found myself standing at the edge of a long trail, excited yet slightly nervous about the challenge ahead. I had packed everything I thought I needed, but halfway through the climb, the heavy water bottles and bulky gear started slowing me down. Best Lightweight Hydration Backpack for Hiking was a term I kept hearing from fellow hikers, and I realized why—it’s not just about carrying water, it’s about making your journey easier, lighter, and more enjoyable.
Whether you’re looking for an ultralight hydration backpack for trekking, a lightweight hydration pack with bladder, or even a compact hiking hydration backpack perfect for day trips, choosing the right one can transform your entire outdoor adventure.
Post Contents
- 1 Best Lightweight Hydration Backpack for Hiking
Best Lightweight Hydration Backpack for Hiking
From a breathable hydration pack for summer hiking to a durable hydration backpack for rough trails, each style fits a different type of hiker’s need.
If you want to know which features truly matter and discover the best hydration pack for long hikes, keep reading—you might just find the backpack that makes every hike unforgettable.
Finding the Best Lightweight Hydration Backpack for Hiking can make a huge difference in your comfort and performance on the trail. A good pack should feel like a natural extension of your body, not a heavy burden. It’s all about staying hydrated without being weighed down by unnecessary bulk.
Why a Lightweight Hydration Pack Matters
When you’re out on the trails, especially on a long hike or a challenging mountain trail, every ounce counts. A lighter pack reduces strain on your shoulders and back, allowing you to hike farther and with less fatigue.
This is why many hikers, from casual day-trippers to experienced trekkers, are opting for a lightweight hydration pack with a bladder. These packs are designed for efficiency, giving you easy access to water and a small amount of gear. They are especially popular for hot weather hiking where staying cool is essential.
Choosing the Right Size and Capacity
The first step in picking the best lightweight hydration backpack for hiking is to consider its size. For a typical day hike, a pack with a capacity between 10 to 25 liters is usually perfect.
This range offers enough space for your essentials, like a first-aid kit, some snacks, and a light rain jacket, while still keeping the overall weight to a minimum.
Remember, an ultralight hydration backpack for trekking is a minimalist’s dream, but you need to be sure it can hold everything you need. For longer adventures or multi-day hikes, you might need a slightly larger pack, but for day trips, keep it simple and light.
Finding a Comfortable and Secure Fit
A good fit is arguably the most important feature of any hiking backpack. You should look for a pack with adjustable straps for the shoulders, chest, and hips.
A well-fitting pack will distribute the weight evenly across your torso, not just on your shoulders. The pack should sit snugly against your back without bouncing or shifting as you move.
Many packs are now made with soft, flexible fabrics and breathable mesh panels. This kind of breathable hydration pack for summer hiking helps prevent sweat build-up and keeps you comfortable even on the hottest days.
Hydration System and Other Key Features
Before picking a pack, know what makes it great. Several factors separate good packs from amazing ones.
Optimal Capacity and Size
For day hikes, a 10 to 25-liter pack is usually perfect. This size holds plenty of water, snacks, and a jacket. A compact hiking hydration backpack won’t feel too big or too small. It’s the ideal balance for most trails.
Superior Comfort and Fit
A pack must feel good on your back. Look for adjustable straps and a secure fit. The best hydration pack for long hikes will feel like part of you. It shouldn’t bounce or rub. Always check the manufacturer’s sizing guide for a perfect match.
Essential Hydration System
Most packs are built to hold a hydration bladder. This lets you sip water hands-free through a tube. Some packs include a bladder, while others require a separate purchase. Look for a bite valve with an on/off switch to prevent leaks.
Breathability and Ventilation
Hiking works up a sweat. A good pack has a breathable mesh back panel. This feature keeps air moving and your back cooler. A breathable hydration pack for summer hiking is a must for comfort.
Practical Storage and Pockets
Organization is key. Look for easy-access pockets for your phone, keys, and snacks. Some packs have special compartments for sunglasses or a map. A hydration backpack with storage for hiking keeps your gear secure and easy to find.
Our Top Picks for the Trail
Now, let’s look at some standout models that hikers love.
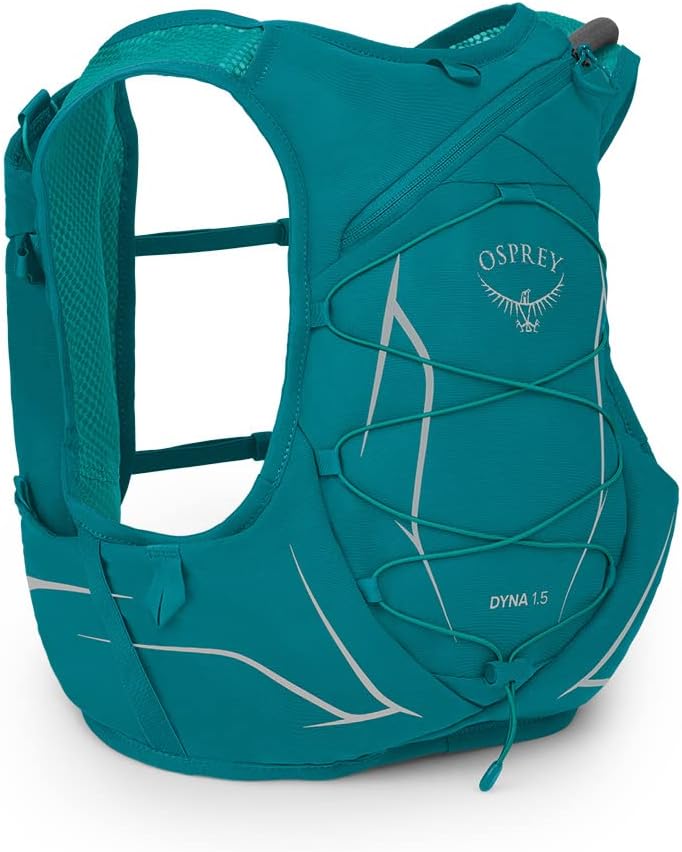
The All-Rounder: Osprey Dyna 1.5L

This pack is a favorite for good reason. It offers a super comfortable and snug fit. The soft fabrics and breathable mesh make it ideal for hot days. It’s perfect for short runs or long day hikes. Many consider it one of the top rated hydration pack for backpacking day trips.
The Durable Choice: CamelBak Circuit

Known for reliable hydration systems, CamelBak delivers with this model. It’s built to last on rough trails. The reservoir is easy to fill and clean. It’s a durable hydration backpack for rough trails that won’t let you down.
The Speedster’s Pick: Salomon Agile 12

If you like to move fast, this pack is for you. It’s designed for stability during quick movements. The design is minimalist but highly functional. It’s a fantastic lightweight hydration pack for mountain trails and fast-paced hiking.
How to Choose Your Best Lightweight Hydration Backpack for Hiking
Follow these simple steps to find your perfect pack.
- List Your Needs: First, think about your typical hike. How long are you out? What weather do you face? What gear do you always carry?
- Set a Capacity: Based on your list, choose a size. A 15-20 liter pack is a great starting point for most day hikers.
- Prioritize Fit: Comfort is everything. Read reviews about how the pack fits different body types.
- Check the Features: Decide which features are must-haves for you. Is it extra pockets, a specific bladder size, or maximum breathability?
Conclusion:
As I reached the end of my journey, sitting on a rock and watching the sunset, I realized how much of a difference the Best Lightweight Hydration Backpack for Hiking had made.
No more dragging heavy bottles, no more struggling to find space for essentials—just pure freedom on the trail. The right choice can turn a tough climb into a refreshing adventure, whether you’re using an ultralight hydration backpack for trekking, a lightweight hydration pack with bladder, or even a compact hiking hydration backpack designed for short trips.
For longer journeys, a hydration pack for day hikes, a lightweight water pack for mountain trails, or a hydration backpack for multi-day hikes can keep you going without worry. Even in the heat, a breathable hydration pack for summer hiking or a minimalist hydration backpack for hiking can make all the difference.
From a hydration pack with storage for hiking to a durable hydration backpack for rough trails, the right choice ensures comfort and convenience. If you’re ready to make your outdoor adventures unforgettable, take the time to find the top rated hydration pack for backpacking or the best hydration backpack for trail running and hiking.
I’d love to hear your experiences—please like, share this post, and drop your thoughts in the comments below so we can inspire more hikers to find their perfect fit.